Showing posts with label Baking. Show all posts

Taco Tuesday


There's a first time for everything and I always like taking on new challenges...especially when it comes to baking. Even if it doesn't come out the best, its still fun to put your creativity into something and make someone happy. And today we did just that for Mijo's birthday! It was either a taco or a bean dip can...the taco seemed more visually appealing, so we went with that.

I have to say that this didn't turn out hard to pull off and anyone can do it! Yes, its easier with a KitchenAid Mixer for the fondant, but the rest - facilĂ­simo!

Here's what you'll need: 

  • Cake Mix {or make your own} 
  • Chocolate Frosting 
  • Chocolate Chips 
  • Marshmallow {large or small} 
  • Powered Sugar 
  • Water 
  • Candy Orange Slices {in variety kind for orange and red} 
  • Rip Cords {in apple} 
  • Orange Food Coloring While your cake is baking, you can get going on setting up the rest of your "condiments'. 

Your taco shell is really just fondant mixed with orange food coloring, rolled out, and shaped into a opal. The opal shape allows you to have some space for the cake underneath without taking away from your taco sides!

The Candy Orange Slices will be your tomatoes, so you'll want to cut those into cubes. I used the orange and red versions for a little more realistic coloring. For your lettuce, take the Rip Cord apple candies and pull on the individual pieces. For your cheese, simply use some of your extra fondant from your taco and slice thinly. And finally for your meat, mix the chocolate chips into your chocolate frosting!

Fondant:

  • 16 ounce (450g) bag of mini marshmallows 
  • 2 tablespoons (30ml) water 
  • 2 pound (900g) bag of powdered sugar 

To Prepare:
  • Pour your marshmallows into a microwave safe bowl 
  • Pour 2 tbsp of water into the bowl and microwave for 1 minute 
  • Your Marshmallows will then be nice and gooey and poor them into your Kitchenaid mixer (if available) - Otherwise your mixin boo and gettin yourself an arm workout! 
  • Slowly add your powder sugar to the bowl as the consistency gets thicker. If the powdered sugar doesn't end up making it firm enough for you, I suggest added a bit of flour which has helped solidify it better. 
  • Once your fondant is solid enough, you can then shape it into anything! 
  • At this point you'll want to take your cake out and let it cool. 

Once your cake is ready to dress, begin to assemble your taco!

  • Take your taco shell opal and put on the plate you'll be serving on 
  • Put the cake in the taco shell and cover the cake only with chocolate frosting to help the fondant stick to the cake (not the meat frosting yet!) 
  • Then bring up the side of your taco shell - To better hold the sides onto the frosting, I used two skewer sticks I stuck through the cake so they didn't fall while in the fridge. 
  • Next, add your condiments! Meat first, then your lettuce, tomatoes, and cheese! And that's it! TACO CAKE! Enjoy!! 


Smore's Brownies to Ease the Mind...

Woo! What a whirlwind of a week...but the road trip begins TOMORROW! crazy! its around midnight and it still hasn't hit me yet...it's all feeling a little surreal right now. 

But I promised these S'mores Brownies I made and the recipe you will get! :)

It was just what I needed after a long day of waking up early and packing the car. So while I packed, they baked and the result came out better than I thought! Enjoy! and don't forget to join my brother and I on our great adventure to the West Coast!


Smores Brownies: 

  - 2/3 of a box of Graham Crackers
  - 1 box of No Pudge or Reduced Guilt Brownie Mix
  - 1 vanilla yogurt cup (required for brownie mix)
  - 1/4 cup of margarine (melted)
  - 1/2 cup of mini marshmallows
  - Chocolate Sauce

Heat oven to 350 degrees, then proceed to: 

First crush the graham crackers in a bowl
then add your melted butter to make a crust...
spread the crust on the bottom of a greased pan
After mixing your brownie mix with one vanilla yogurt cup, pour brownie mix on top of crust and put in the oven for 24-30 minutes
Once the brownies have cooled, cut into individual pieces and put on a cookie tray
When about ready to serve, put 10 marshmallows on each piece and put in the oven for 7-10 minutes till all brownies are warm
Put brownies on individual plates and drizzle with chocolate sauce! Looks so fancy eh?!

Dinner Served: Coconut Chicken with Apricot Glaze


This Coconut Chicken recipe was so yummy and actually turned out to be a pretty low maintenance meal that simmered and cooked while I got to catch up on the latest episode of Louie. The apricot dijon glaze was a perfect pairing and you can serve it on a bed of rice, mashed potatoes, salad, or veggies. Would even make good in a wrap! Enjoy! xo

1 egg
1 cup sweetened coconut flakes
1/2 cup flour
1/2 teaspoon garlic powder
1/2 teaspoon salt
1/4 teaspoon black pepper
4 boneless chicken breasts
1/2 cup unsalted butter, melted
1/4 cup apricot preserves
2 tablespoons Dijon mustard

Preheat the oven to 400˚F.  Line a baking sheet with parchment paper.

Lightly beat the egg in a medium bowl; set aside.  Mix the coconut, flour, garlic powder, salt and pepper in a shallow bowl.  Dip each piece of chicken in the bowl with the beaten egg and then coat with the coconut mixture.  Before popping in the oven, drizzle with the melted butter.  Bake for 30 to 40 minutes, flipping once halfway..

To prepare the apricot sauce, mix the apricot preserves and the Dijon mustard in a small bowl. 


Festive 4th of July Treats

Oh boy...that's a lot of July 4th goodness right there...

Our wonderful countries patriotic & whimsical holiday is this weekend and I am sure everyone has plans to enjoy some fantastic food, good company and of course a sparkly display of fireworks!

So whether you're throwing a party or need to bring some goodies, try some of these festive treats below:


7. Festive Smores on a Stick

Cheesecake Filled Strawberries

Finally it's starting to look sunny out there! I'm starting to think were LA now with groggy mornings and the sun's out by 1! But nothing beat Sunday's Easter weather, wasn't that perfect?! I cannot wait until that kind of weather is more consistent! Everyone hang in there, we'll be there before you know it.

Another great thing about heading into summer is all the "cool" treats that come out - Like fruit bowls and summer salads, not to mention ice cream blizzards and beach popsicles. Or try Cheesecake Strawberries! They are super simple and as always, I'll teach you how to make them using the quicker "no time for baking" route:

All you need is: 

- Two bundles of strawberries - need to pick out the medium to large sizes
- Graham cracker crust - crumbles the best and the mess stays in the pan!
- Three slices of cheesecake or use a cheese cake pudding, J-E-L-L-O style
- Melting chocolate - your choice, dark or milk chocolate

Using a butter knife (or if you have a tiny spoon scooper), just cut a hole on top of the strawberry - you'll be pleasantly surprised to find out that strawberries are already hollow! So you just need to get down to that hollow middle. Using a blender, toss the three slices of cheesecake in there and blend till its nice and creamy, like a frosting consistency, and scoop into a decorating bag (you can use an open tip to allow some of the chunkier crust pieces through or none at all). After filling each strawberry, just simple roll in the graham crackers and sliver with the melted chocolate, as seen below:


Start out with a good batch of strawberries - Lovely reds!

Throw cheesecake into a cake decorating bag and swirl into the hollow strawberry

Using crumbled graham cracker pie crust, dip and roll the top of the strawberries into the crumbs

Dip a spoon into the melted chocolate and sway back and forth across strawberries for a decadent affect


No Bake Holiday Treats

A three day weekend and a holiday weekend coming up? LOVE! Why? well aside from the obvious of the extra time off, holiday food and baking is my favorite. So many choices and new recipes to try!

Don't know what to bring to the family event or to a loved ones home? or maybe you don't have time to bake all morning and need something that is quick and effective (that's what she said) - Try one of these easy NO BAKE recipes below:


©tipjunkie.com

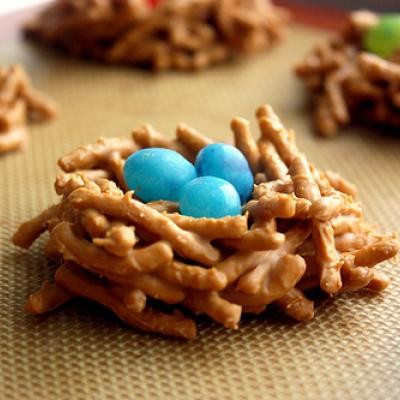
Bird's Nest Cookies

12 oz. package chow mien noodles 
12 oz. package butterscotch morsels - OR - you can use Peanut butter as well!
90 egg-shaped candies - Whether they are cadbury eggs or jelly beans (cadbury would go great with PB)

Pour the butterscotch (or pb) morsels in a microwave-safe bowl and place them in the microwave. Heat for 30 seconds then remove to stir. Stir until melted. Add in the chow mien noodles and mix till combined. Use a 1/4 measuring cup to portion out the cookies onto the baking sheet. If the mixture starts to solidify in the mixing bowl, you can reheat for 15 to 30 seconds to melt. Place three egg-shaped candies in the center of each cookie. Allow to set for at least 5 minutes before serving or transferring.

TIP: Dip the bottom of the eggs with melted butterscotch or pb morsels before placing them on top. 


©pinterest.com

Frozen Bananas Dipped in Nutella w/toppings

This might be the easiest one to make and you can put as many different topping on each one as you like. Cut the bananas first and place your Popsicle sticks in the pieces ( you can find the sticks at places like Michael's or even at Target). Just simply freeze your bananas for about a 1-2 hours ( you don't want them to be rock hard but frozen enough to chill the nutella when you dip them. Though the Nutella is creamy already, just throw it in to the microwave for a few seconds to soften and thin it out even more. Then place your different toppings in separate bowls - crunch bars, nuts, coconut, peanut butter chips, etc and place on parchment paper when finished to let cool. You can even pop them back in the freezer for a few minutes to let them settle and freeze back up until you are ready to serve!


©Tammi's Kitchen


Cheesecake Chocolate Dipped Strawberries
 
Whole Strawberries
Philadelphia Ready-To-Eat Cheesecake filling
Dipping Chocolate
Small cupcake cups


Using a small paring knife, core the center of each berry being careful to leave the bottom in tact. Fill a plastic baggie with the cheesecake filling. Fill each berry with cheesecake continuing on top of berry with a pretty design.

In a microwave-safe bowl, melt chocolate at 30-second intervals until chocolate is smooth and creamy. Dip each strawberry into chocolate, covering 3/4 of the berry and use extra chocolate after tipping to create a pretty design - to do, I simply use a butter knife or spoon, dip it in the chocolate and wave it back and forth across the berry.  For easy transportation, put them right into the small cupcake cups to place on a platter.