Showing posts with label Sweettoothe. Show all posts

Taco Tuesday


There's a first time for everything and I always like taking on new challenges...especially when it comes to baking. Even if it doesn't come out the best, its still fun to put your creativity into something and make someone happy. And today we did just that for Mijo's birthday! It was either a taco or a bean dip can...the taco seemed more visually appealing, so we went with that.

I have to say that this didn't turn out hard to pull off and anyone can do it! Yes, its easier with a KitchenAid Mixer for the fondant, but the rest - facilĂ­simo!

Here's what you'll need: 

  • Cake Mix {or make your own} 
  • Chocolate Frosting 
  • Chocolate Chips 
  • Marshmallow {large or small} 
  • Powered Sugar 
  • Water 
  • Candy Orange Slices {in variety kind for orange and red} 
  • Rip Cords {in apple} 
  • Orange Food Coloring While your cake is baking, you can get going on setting up the rest of your "condiments'. 

Your taco shell is really just fondant mixed with orange food coloring, rolled out, and shaped into a opal. The opal shape allows you to have some space for the cake underneath without taking away from your taco sides!

The Candy Orange Slices will be your tomatoes, so you'll want to cut those into cubes. I used the orange and red versions for a little more realistic coloring. For your lettuce, take the Rip Cord apple candies and pull on the individual pieces. For your cheese, simply use some of your extra fondant from your taco and slice thinly. And finally for your meat, mix the chocolate chips into your chocolate frosting!

Fondant:

  • 16 ounce (450g) bag of mini marshmallows 
  • 2 tablespoons (30ml) water 
  • 2 pound (900g) bag of powdered sugar 

To Prepare:
  • Pour your marshmallows into a microwave safe bowl 
  • Pour 2 tbsp of water into the bowl and microwave for 1 minute 
  • Your Marshmallows will then be nice and gooey and poor them into your Kitchenaid mixer (if available) - Otherwise your mixin boo and gettin yourself an arm workout! 
  • Slowly add your powder sugar to the bowl as the consistency gets thicker. If the powdered sugar doesn't end up making it firm enough for you, I suggest added a bit of flour which has helped solidify it better. 
  • Once your fondant is solid enough, you can then shape it into anything! 
  • At this point you'll want to take your cake out and let it cool. 

Once your cake is ready to dress, begin to assemble your taco!

  • Take your taco shell opal and put on the plate you'll be serving on 
  • Put the cake in the taco shell and cover the cake only with chocolate frosting to help the fondant stick to the cake (not the meat frosting yet!) 
  • Then bring up the side of your taco shell - To better hold the sides onto the frosting, I used two skewer sticks I stuck through the cake so they didn't fall while in the fridge. 
  • Next, add your condiments! Meat first, then your lettuce, tomatoes, and cheese! And that's it! TACO CAKE! Enjoy!! 


Orange Blossoms


I think I just found my new go-to breakfast and guilty pleasure latte house, thanks to co-workers Sergio and Mark! I've passed Orange Blossoms Cafe a few times now while out and about in Solana, and after a daily coffee break stroll the other day, I obviously had no clue what I was missing! With a menu board filled with delicious sweet and lunch crepes, I couldn't keep my eyes off each gooey concoction that went past us. And the coffee menu is just as droolworthy, with a Nutella Latte and Peanut Butter Mocha. I'm hooked!


No Bake Holiday Treats

A three day weekend and a holiday weekend coming up? LOVE! Why? well aside from the obvious of the extra time off, holiday food and baking is my favorite. So many choices and new recipes to try!

Don't know what to bring to the family event or to a loved ones home? or maybe you don't have time to bake all morning and need something that is quick and effective (that's what she said) - Try one of these easy NO BAKE recipes below:


©tipjunkie.com

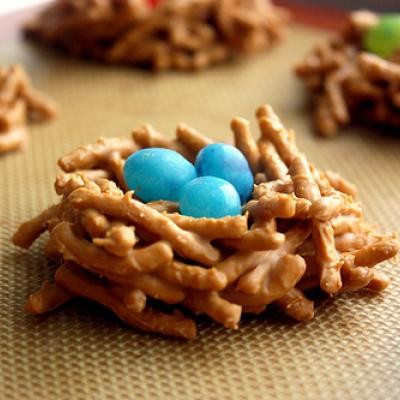
Bird's Nest Cookies

12 oz. package chow mien noodles 
12 oz. package butterscotch morsels - OR - you can use Peanut butter as well!
90 egg-shaped candies - Whether they are cadbury eggs or jelly beans (cadbury would go great with PB)

Pour the butterscotch (or pb) morsels in a microwave-safe bowl and place them in the microwave. Heat for 30 seconds then remove to stir. Stir until melted. Add in the chow mien noodles and mix till combined. Use a 1/4 measuring cup to portion out the cookies onto the baking sheet. If the mixture starts to solidify in the mixing bowl, you can reheat for 15 to 30 seconds to melt. Place three egg-shaped candies in the center of each cookie. Allow to set for at least 5 minutes before serving or transferring.

TIP: Dip the bottom of the eggs with melted butterscotch or pb morsels before placing them on top. 


©pinterest.com

Frozen Bananas Dipped in Nutella w/toppings

This might be the easiest one to make and you can put as many different topping on each one as you like. Cut the bananas first and place your Popsicle sticks in the pieces ( you can find the sticks at places like Michael's or even at Target). Just simply freeze your bananas for about a 1-2 hours ( you don't want them to be rock hard but frozen enough to chill the nutella when you dip them. Though the Nutella is creamy already, just throw it in to the microwave for a few seconds to soften and thin it out even more. Then place your different toppings in separate bowls - crunch bars, nuts, coconut, peanut butter chips, etc and place on parchment paper when finished to let cool. You can even pop them back in the freezer for a few minutes to let them settle and freeze back up until you are ready to serve!


©Tammi's Kitchen


Cheesecake Chocolate Dipped Strawberries
 
Whole Strawberries
Philadelphia Ready-To-Eat Cheesecake filling
Dipping Chocolate
Small cupcake cups


Using a small paring knife, core the center of each berry being careful to leave the bottom in tact. Fill a plastic baggie with the cheesecake filling. Fill each berry with cheesecake continuing on top of berry with a pretty design.

In a microwave-safe bowl, melt chocolate at 30-second intervals until chocolate is smooth and creamy. Dip each strawberry into chocolate, covering 3/4 of the berry and use extra chocolate after tipping to create a pretty design - to do, I simply use a butter knife or spoon, dip it in the chocolate and wave it back and forth across the berry.  For easy transportation, put them right into the small cupcake cups to place on a platter.